It’s mini book day here at Simple Scrapper! We’ve got an awesome giveaway with TWO winners and a fun Twitter chat tonight.
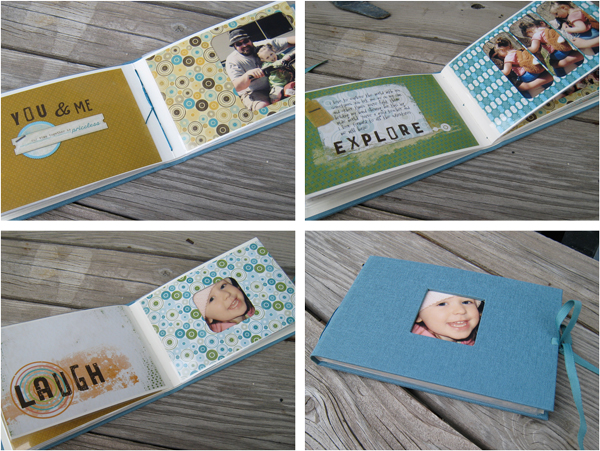
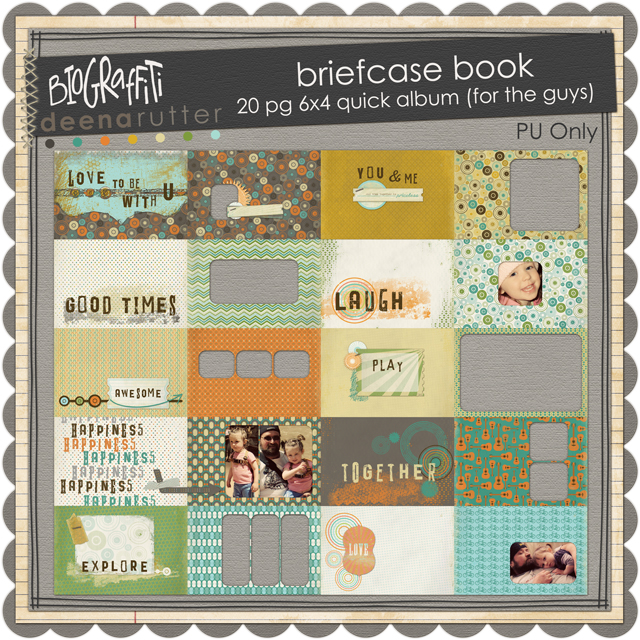
Molly of Biograffiti and Deena Rutter have teamed up to create a gem of a quick album. With lots of fun colors in a gender neutral scheme, the Briefcase Book is the perfect little set to honor a special adult-child relationship.
Molly and Deena are giving away a total of 6 of these sets this week. Two here on Simple Scrapper, two at Persnickety Prints, one on the Biograffiti blog, and one on Deena’s blog. If you love love love it, just pop on over to buy it at Oscraps now!
To enter for one of the albums, please leave a helpful tip for making digital, hybrid or 100% traditional mini books, small albums and pocket projects by noon on Tuesday, June 8! The second album will be given away to an attendee at tonight’s #scrapchat Twitter party!


The only hit I can think of is to remember that just because a paper is sized as 12×12 it doesn’t mean you can’t change it, stretch it, or shrink it. I’m still a beginner so I’ll be interested in what everyone says! Thanks for the chance!
I made a mini album at a class and I loved how simple they made it, and it’s finished! I liked that they used around 3-4 12×12 papers and cut them down for the same album. And to even make it more simple, keep the layout the same for each page with few elements/embellishments (if you use any).
If you have a lot of photos from different times and places and want them all to be together in a mini album, try to make them all black & white before. It will cause your photos to integrate.
xoxo
If you already have 12×12 templates..when you start resize template 6×6. Then size your papers and elements accordingly when you do your page. I use transform and scale using 10% decrease at a time not to change the quality of the design. Go transform – scale – change width and height to 90%. If that isn’t enough go back to transform and click again. Do this until you get the desired look.
When making a themed mini album and you don’t have a great photo of that Red Dog Saloon you visited in Alaska, just go to Google Images or Flickr, or Yahoo Images and use one of those. Be sure to check the resolution size first. Also remember that the mats in templates are not set in stone they can be adjusted to size just as if you yourself put them there. I made an ABC book using this information. I am new, so it all may be old to you. But it’s my tip which fascinated me just last month.
to make a paper mini album quick and easy, choose several coordinating double-sided 12×12 papers from the same line. (for extra simplicity purchase a pack or two of embellishments from the same line). choose a size that fits nice “into” 12×12 – such as 6″x6″ (four pages from each sheet) or 4″x6″ (6 pages from each sheet) or get creative with 6″x12″ or 4″x12″ – fun! by using double-sided paper, you get twice the mileage from each sheet…you don’t have to back it on a “base” of cardstock or chipboard, and you don’t have to glue too sheets together. easy peasy!
ps – love this mini album…PERFECT for father’s day.
Use junk mail business envelopes that you fold in half to make the base of your mini album–inexpensive and recycling!
Such great and inspirational ideas here already!
I use mini 3×3 canvases for mini book covers…you accordian fold your 12×12 cardstock cut down to 3×12, attaching the three strips to make your book.
I use strong adhesive to attach the canvases to the paper after I paint and decorate them with paper, ribbon, whatever I want!
There are so many uses for these little books, and they sit well on a shelf to show off too!
This mini book you are offering ROCKS!! Thanks
I love making little minialbums in 4×6 size and putting pics in affordable “brag book” albums from the local store. It’s not where I put my “fancy fancy” paper LOs, but they are small enough for the kids to handle, or to send off to Grandma (I even borrowed one of hers the other day when I was meeting with old friends and realized I didn’t have a small brag book of my own with recent pics of the kids!). I often use (sometimes mdofied) kits for the digi minialbums and “thicken” them up by adding in random full page pictures to the book.
I don’t totally dig matchy matchy albums. I like making each album page unique. Although, this doesn’t save anytime so it might not be that great of a tip. =) Just follow your style is what I am trying to say. =)
I like how mini albums can be done so quickly and you feel like you have accomplished something. Even though the fancy shapes for many mini albums are soo cool, if I’m going for fast, then I go for something that is easier to cut out and assemble. For instance a 4 x 6 rectangular album is faster to assemble than a bracket or scallop album. Hopefully that makes sense.
Thanks for the opportunity.
Use old (cork/board type) place mats or coasters. Give them a bit of a sanding, drill holes in them, use modge podge to stick your digi scrapped 4×6 photos to them (you may have to crop them to size if using coasters) then give them a couple of coats of modge podge on top. Once they dry attach book rings to them and your new flip mini book will be able to handle the roughest of littles hands in the household. If they get grubby, you can just give them a quick wipe 🙂
One idea I really like is to make the quick-cut pages as people have mentioned (e.g. stack doublesided 12×12’s and cut them all at once down to 4×6’s), follow a theme (repeat the same idea in variations on all the pages), and then laminate the pages. Punch holes through along the edge for all of them, then tie them together with yarn or use a ring or whatever you like. Makes a very quick album that is especially great for little ones to drool on if they like. 🙂
Love this giveaway, will have to check out those other blogs too!! 🙂
So far I have only made traditional mini-albums. The one way that makes thinks go so much faster is to pick a coordinating paperline with embellishments. It makes things move fast when you can have everything matching.
My best tip is to start with a goal in mind and also to use a layout that you can flip or rotate–so you end up using the same basic idea for each page and don’t have to recreate the wheel every time.
In making mini-albums, or pages of any size, it is best to refer to a color-wheel. This aids in choosing just the right colors of papers and elements so that everything goes together perfectly.
I love your mini album. Would work so well for photos I have with my Grandson.
I haven’t done many mini-albums, but I’d say that coordinating papers and embellishments help a lot! And I usually have the pictures all in black and white so the colors of the pictures don’t compete with the colors of the page.
Hints? I need hints as I have just discovered these. So my hint is to research it online before trying to make it. 🙂
I love to download and print different layouts that I use to scraplift elements or get inspiration from. When I really like to know what proportions were used to make the layout, I save the online layout, copy and paste to Microsoft Word. I then size them in Word according to either 8.5 x 11 cm. (my preferred size) or 12 x 12 cm. This way, I can measure the size of the photos used by using a cm. ruler and translating the numbers to inches. Sounds confusing, but does it make sense to you? Also the 8.5 x 11cm. size fits great into a recipe box.
The quickest, easiest way to a mini-album? Stick with a 4 x 6 format. Photos on one side, journaling and minimal embellishments on the other (and/or cropped photos). If you’re going digital, print/develop “pages” on 4 x 6 photo paper. Easy peasy.
My tip is to keep in mind that mini-books are a good way to break out of the routine a bit. If you usually do paper scrapping, a mini-book would be a fun way to try digi. And if you usually do digi, you can join your paper scrapping friends at a crop by working on a small mini-book project.
Use Distress Ink on the edges! Really completes it, especially if it isn’t cut just right and you see a white edge.
My tip is to use the redline tape! It seems to hold the best and it comes in different widths. I love it!