This is a guest post from team member Ronnie Crowley.
When I was a paper scrapper 90% of the time I would start with a sketch. I had several books and I would save binders of sketches by number of photos. When I started digital scrapbooking it wasn’t really a big change for me to use templates as a base of a layout. In actuality, it was even easier once you know how to clip papers to layers.
My work flow though doesn’t start with a template. I first have to choose the pictures I’m working with and the way I do this is a skill I learned in a class with Katie Nelson (aka Katie the Scrapbook Lady). Her class isn’t currently available but if it ever runs again I would highly recommend it. The class was called Power Scrapping – Digi Style. Power Scrapping was something I first came across in my early days as a paper scrapper with Creative Memories but it was never something I had done. Katie’s class was an eye opener. Now when I am working on a project with lots of photos, it is the method I use.
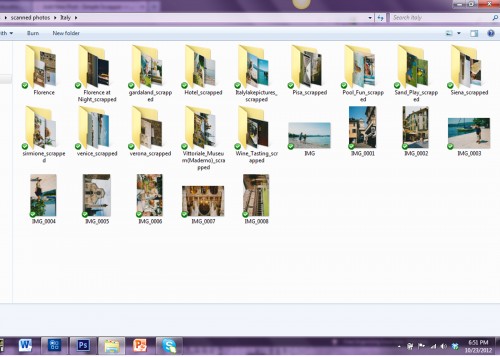
The basic idea is to collect your pictures into folders for each layout your planning on doing. For the Italy trip I’ve been working on recently, I have the following structure set up. (click photos to enlarge)
You can see I have separated my folders into the locations. Some of these have been divided even further when I wanted to do more than one layout for that place. You can also see some of the folder names have the word scrapped against them.This is how I record when I’m done.
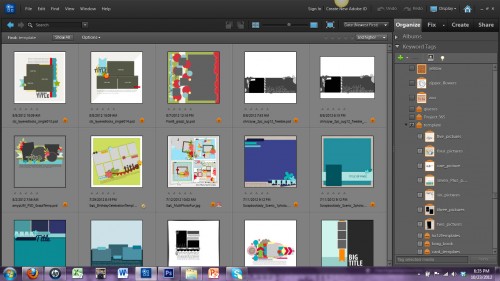
When I have a moment to scrapbook I open a folder and see how many pictures I have. I then open the Elements Organizer. (I currently use Photoshop Elements to organize my supplies but you could do this is whatever system you use.) In my organization structure I have a tag for templates – so I can find just all my templates.
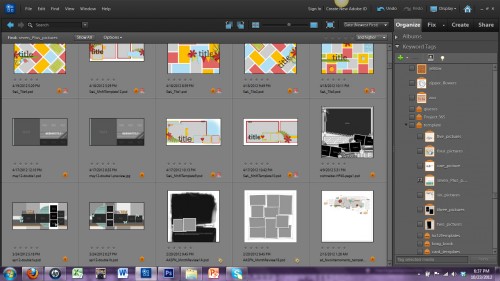
Under the template tag I have my templates tagged by number of pictures. I can drill down to the templates with the correct number of pictures.
I can then scan through these and find the template I want to use.
Once I have my template I add the pictures. (Editor’s Note: Here’s a video tutorial on using templates.) The rest of my work flow is pretty basic. I start with papers, selecting them using the colors from my pictures. The beauty with digital scrapbooking is I can switch paper in and out until I’m happy.
When I’m not scrapping for a specific designer I like to pick and choose from my whole collection of supplies, mixing and matching from different designers. If I decide I want a red paper I would search under my tag for red. Sometimes the selection of my papers will lead me to embellishments within a kit that I want to use, but other times when I’m ready to embellish I will look for them under my tags for color and type – say red buttons.
Once all my papers and embellishments are added, I have one final step before I save my layout for printing. I go through each layer of my layout and check the shadows. In my mind shadows are what make a digital layout and so this last step is very important. When I’m doing this I’m checking that the angles are all working and are consistent. I also check that the blend mode used is consistent.
Remember that any work flow is constantly a work in progress. As I develop and change as a scrapbooker I will tweak my work flow to develop it further. If you come back in twelve months I’m sure I’ll be doing something different. There is no right or wrong way; there is just the way that works for you.
Is your process similar to or different from Ronnie’s? Share in the comments.

Great tip Ronnie – I have a beach vacation from last May that I have been dreading – this breaks it down a bit more maneagable pieces- I will have to give it a try.
Wow, just had an “a-ha!” moment! Love the idea of choosing pictures and putting them in folders! Sometimes, more often than not, I’ll put scrapping off because its so overwhelming…but, I’ll keep that in mind, that any work flow is a work in progress! A little goes a long way!
I’m a bit late with getting back to leave a comment. I also like organizing my photos, but I do it in collections in Lightroom (similar to albums in PSE Organizer, which I used a few years ago). It really makes it so easy to grab your photos and look for templates to start from.
I’m a little behind in my reading, but had to tell you that I really appreciated this article. It’s sometimes nice just to hear that someone else is doing the same thing and it works for them! I copied my pictures into folders for the last few projects I did and it helped immensely. I’m also working on organizing my supplies in PSE11…this is a time consuming process, but it really has helped in the long run.
Just a question: How detailed do you get when you are organizing your supplies? I have folders for designer/kits, templates, color, “things” (buttons, ribbon, etc) and “theme”. As I’m sitting here organizing and my arm and fingers are sore from overwork 😉 I question if I’m doing too much.
Thanks Ronnie!